ComboCurve: Merging Projects
Merging and Copying Projects
In this article, we outline the steps necessary to merge and copy projects. This feature is a very useful tool that allows the user to combine two separate projects and further merge the contents of those two projects (scenarios, forecasts, etc.) into one single project.
Note: Merging projects DOES NOT affect the original projects, a new project will be created.
Navigate to the projects page and select the two projects that you wish to merge. Be sure to use the filter methods, as seen fit, to best find your projects.
Once, you have selected your desired projects, the "merge" button at the top will become enabled. Select this button and you will be brought to the next page.
Once here, we first want to ensure that the projects are in the proper order under the "Merge Projects" section in the top left corner. It is important to note that project on top will take priority in the merging process. We can then give the new project a name and select the well identifier that will be used to identify overlapping wells within the project, which will be INPT ID by default. At the bottom, you can see the overlapping and final well count for the merged project.
In the modules section, we can view the duplicate items in each of the projects being merged. For each module, you can see the amount of models in each project.
Any model with matching names across the projects will have a duplicate name suffix added to the model of the second project within the merged project. This suffix can be adjusted as desired in the editing box on the left. Additionally, you can change the suffix to a prefix if you wish.
The last section contains any project custom headers. Please note, if there are none in either project, this will not be shown. To merge the custom headers, select the arrow on the custom header you wish to merge, as seen below.

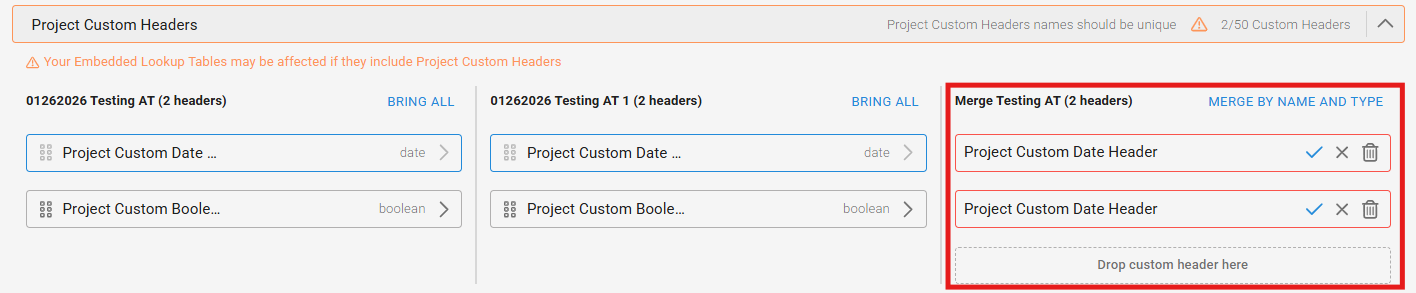
If two custom project headers of the same name are selected to be merged, you will see the red boxes as seen above. To fix this, select the "merge by name and type" button and it will automatically match any custom project headers with shared names.

Please note when merging any project custom headers, any embedded lookup tables that include those headers may be affected in the merged project.
Once complete, select the "merge" button on the top right side of the screen.
Please note when merging any project custom headers, any embedded lookup tables that include those headers may be affected in the merged project.
Once complete, select the "merge" button on the top right side of the screen.
Copying Projects
Copying projects is useful in case you want to make changes to the same project without affecting the original project. There are a few ways we can copy projects and we will outline them below.
The first option is to navigate to the Project you want to copy, and go to the settings page at the top left. From there we can click on the "Copy Project". This will create an identical copy of the project and any changes in the copy will not be made in the original. The name of the copied project will be the same with a "1" at the end of the project name.
The other way to copy a project is from the projects main page where you can view all of your projects.
You will find the project you want to copy and click on the 3 dots next to the project. You can then click on copy.
The process for the copying works the exact same as the other option to copy the project.
As always, if you have any additional questions, please feel free to submit a ticket!
Related Articles
ComboCurve: Project Custom Headers and Project Custom Streams
Project Custom Headers Creating Project Custom Headers Outside of the company level, the user can create project level custom headers. The user can navigate to the project wells page of the project of interest and locate the "Custom Columns" tab. The ...ComboCurve: Company Custom Headers and Company Custom Streams
Company Custom Headers Company Custom headers can be created at the company level under the custom columns tab. Inside the custom columns tab you will see that two options, well headers and production steams. Clicking on well headers allows the user ...ComboCurve: Sharing and Importing Projects (Sharecode)
Share Codes: A share code is ComboCurves' native method for sending a project to another user. Important Things to Note: Importing a project via a Share Code results in a copied project. Any changes to a shared project will not be applied to the ...ComboCurve: Scenarios Coyping, Importing, and Merging
Copying Scenarios Copying scenarios is a great way to safeguard a specific scenario or troubleshoot an issue. To copy a scenario, simply click on the three dots on the scenario you wish to copy, then select copy. If you are using any company level ...ComboCurve: Scenario Custom Streams
Scenario Custom Streams Allow for 20-each of two types of streams for non Oil/Gas/Water forecasted products to be used to model things such as fuel gas, NGL as an Arps Forecast, 2nd gas forecast for multi-zone dual completions, for instance. Company ...